The Western Front was the most significant and deadly theater of World War I. Running through Belgium and northeastern France, it was the line where German forces faced off against French, British and Allied armies in a devastating stalemate that lasted for most of the war. The Western Front became synonymous with the horror of trench warfare, with millions of soldiers living and dying in opposing lines of trenches that barely moved for years at a time. Understanding the geography of the Western Front is essential to understanding the nature and outcome of World War I. This map was created by History Crunch to help students visualize the location and significance of the Western Front and is based on the History Crunch articles on World War I.
World War I Western Front Map
About This Map
This World War I Western Front map was created by the History Crunch team to help students and teachers understand the geographic dimensions of the main theater of the First World War. It is designed as a visual learning tool to accompany our full articles on the Western Front and World War I. Teachers may use it as a classroom display, a geography activity, or a discussion starter about why trench warfare developed on the Western Front and what it meant for the soldiers who fought there.
What This Map Shows
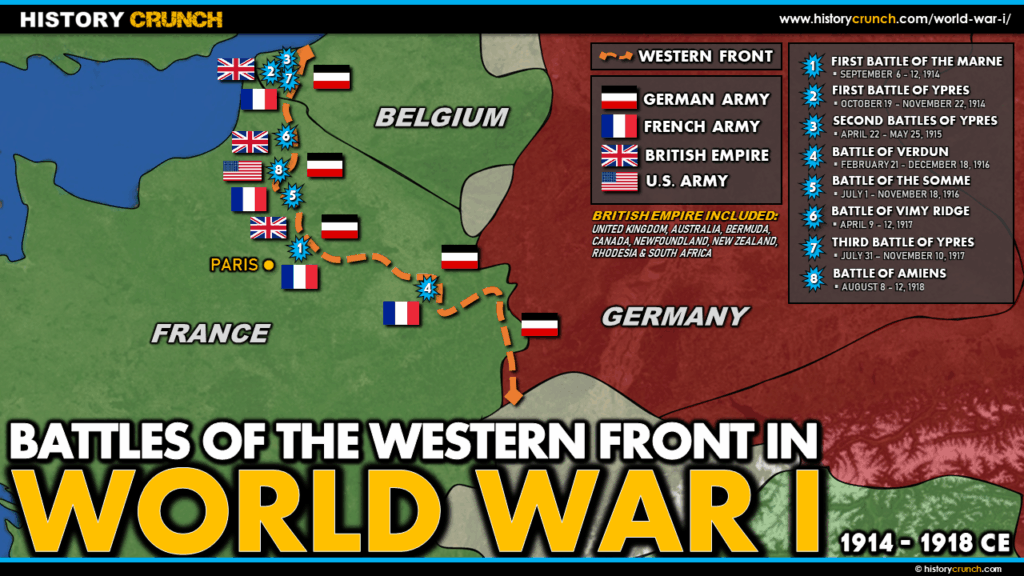
The map shows the Western Front as a line of opposing trenches and fortifications running from the English Channel coast in the north through Belgium and down through northeastern France to the Swiss border in the south. This front line was the result of Germany’s failed Schlieffen Plan, which had called for a rapid invasion of France through neutral Belgium in order to knock France out of the war before Russia could mobilize on the Eastern Front. The plan required Germany to sweep around the French defensive lines and capture Paris quickly. However, French and British resistance slowed and ultimately stopped the German advance, and the front line stabilized into a stalemate in late 1914.
The map highlights the significance of Belgium in the early stages of the Western Front. Germany’s decision to invade neutral Belgium as part of the Schlieffen Plan was the immediate trigger for Britain’s entry into the war, as Britain had treaty obligations to protect Belgian neutrality. The German advance through Belgium and into northeastern France in the opening weeks of the war was rapid and alarming, but was halted at the First Battle of the Marne in September 1914, which marked the failure of the Schlieffen Plan and the beginning of the trench stalemate.
The map shows the trench line that developed following the failure of the Schlieffen Plan. Both sides dug extensive trench systems facing each other across a narrow strip of contested territory known as No Man’s Land. The trenches ran for hundreds of miles and both sides launched massive offensives in attempts to break through the enemy lines, but the combination of machine guns, artillery and barbed wire made frontal assaults extraordinarily costly with minimal territorial gains. The Western Front was characterized by enormous battles that resulted in catastrophic casualties for very little ground. Key battles shown on the map include the Battle of the Somme and the Battle of Verdun, both fought in 1916 and both resulting in hundreds of thousands of casualties on each side.
The map also shows the role of the Alsace-Lorraine region, which bordered France and Germany. France had lost Alsace-Lorraine to Germany following the Franco-Prussian War of 1870 to 1871, and recovering this territory was a major French war aim. The presence of this disputed territory on the Franco-German border had been a major source of the deep mistrust and militarism that characterized the relationship between France and Germany in the decades before the war.
The war on the Western Front finally broke out of its stalemate in 1918 when Germany launched a series of major offensives in the spring, temporarily breaking through the Allied lines. However, the entry of the United States into the war in 1917 had brought fresh troops and resources to the Allied side, and the German offensives ultimately failed. The Allies launched their own successful counteroffensives in the summer and autumn of 1918, pushing German forces back until Germany agreed to an armistice on November 11th, 1918.
How to Use This Map in the Classroom
This map works well as a visual introduction to the Western Front before students read the full articles on trench warfare, key battles and the experience of soldiers. It can be used as a geography activity asking students to trace the trench line from the English Channel to Switzerland and identify the key countries and regions involved. Teachers may also use it as a discussion prompt asking students to consider why neither side was able to break through the trench stalemate for most of the war and what this tells us about the nature of industrial warfare. It pairs particularly well with the WWI map, the WWI alliances map and articles on the Schlieffen Plan and life in the trenches.
Related Articles
To learn more about the topics covered in this map, visit the following History Crunch articles:
- Western Front of World War I
- Schlieffen Plan
- Trench Warfare in World War I
- Life in the Trenches
- Battle of the Somme
- Battle of Verdun
- Eastern Front of World War I
- Allied Powers of World War I
- Central Powers of World War I
- Causes of World War I
- World War I Overview