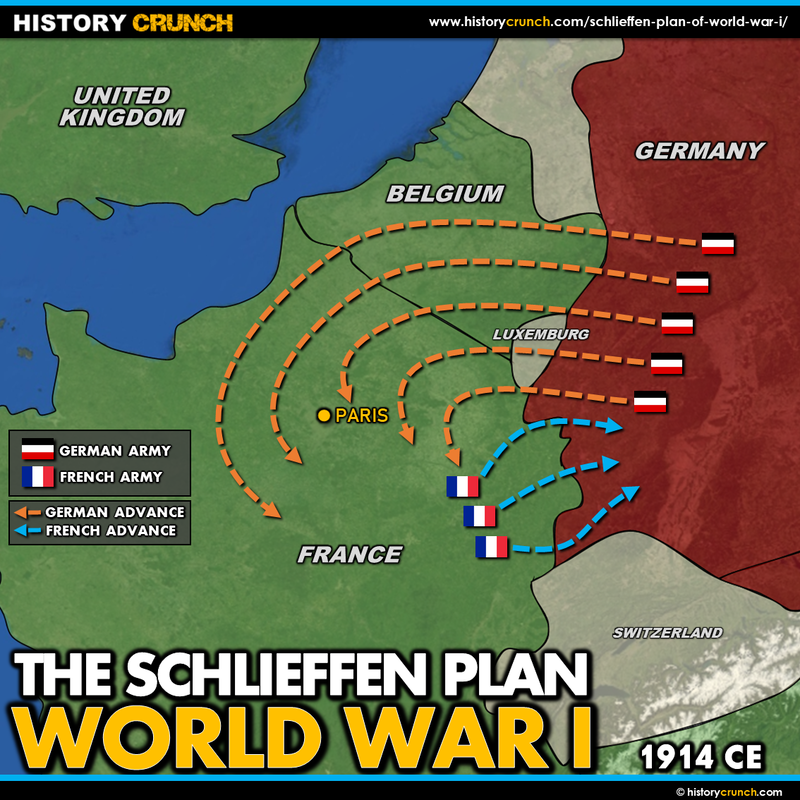
The Schlieffen Plan was Germany’s pre-war military strategy for avoiding a two-front war against France in the west and Russia in the east. Named after the German military strategist who developed it, the plan called for a rapid invasion of France through neutral Belgium, defeating France quickly before Russia had time to fully mobilize its forces. When Germany put the plan into action at the start of World War I in 1914 it failed, and the consequences of that failure shaped the entire course of the war. This map was created by History Crunch to help students visualize the planned route of the Schlieffen Plan and understand why its failure was so significant and is based on the History Crunch articles on World War I.
World War I Schlieffen Plan Map
About This Map
This World War I Schlieffen Plan map was created by the History Crunch team to help students and teachers understand Germany’s opening military strategy in World War I and why its failure had such far-reaching consequences. It is designed as a visual learning tool to accompany our full articles on the Schlieffen Plan and World War I. Teachers may use it as a classroom display, a geography activity, or a discussion starter about military planning, geographic strategy and how the unexpected can change the course of history.
What This Map Shows
The map shows the strategic problem Germany faced at the start of World War I and the route the Schlieffen Plan proposed as the solution. Germany’s central geographic position in Europe meant that any war involving both France to the west and Russia to the east would require it to fight on two fronts simultaneously. German military planners viewed a two-front war as potentially catastrophic since it would split German forces and resources between two separate theaters. The Schlieffen Plan was designed to eliminate this problem by defeating one enemy quickly before turning to face the other.
The core of the plan shown on the map was a massive and rapid German invasion of France, not through the heavily fortified Franco-German border where France had built strong defensive lines, but instead by swinging through neutral Belgium to the north and outflanking the French defenses entirely. By advancing through Belgium and sweeping down through northern France in a wide arc, German forces hoped to encircle Paris and force France to surrender within approximately six weeks. With France knocked out of the war Germany could then turn its full military attention eastward to deal with Russia, which German planners expected to mobilize much more slowly due to the size and underdevelopment of its railway network.
The map shows the planned sweep of German forces through Belgium and into France, illustrating the bold and ambitious nature of the strategy. It also shows why Belgium was such a critical geographic element of the plan, since the flat terrain of Belgium and northern France offered much better conditions for the kind of rapid armored advance the plan required compared to the rugged, fortified border between France and Germany.
The map also shows why the plan failed. French and British resistance proved far stronger than Germany anticipated, particularly at the First Battle of the Marne in September 1914, which halted the German advance and ended any realistic hope of a quick victory over France. Russia also mobilized considerably faster than German planners had expected, forcing Germany to divert troops to the Eastern Front earlier than planned, which further weakened the western offensive. The failure of the Schlieffen Plan meant Germany was left fighting exactly the two-front war it had designed the plan to avoid. Both sides dug into the ground, creating the trench systems that became the defining feature of the Western Front for the next four years.
The map also highlights the strategic consequence of Germany’s decision to invade Belgium. Belgium was a neutral country whose neutrality was guaranteed by treaty, and Britain had treaty obligations to defend that neutrality. Germany’s invasion of Belgium was therefore the immediate reason for Britain’s entry into the war, significantly strengthening the Allied side.
How to Use This Map in the Classroom
This map works well as a visual companion to the Western Front map and pairs naturally with it to help students understand how the Western Front came to exist where it did. It can be used as a geography activity asking students to trace the planned German invasion route through Belgium and identify why this route was chosen over a direct attack across the Franco-German border. Teachers may also use it as a discussion prompt asking students to consider what might have happened if the Schlieffen Plan had succeeded, and how different World War I might have been. It pairs particularly well with the WWI alliances map to help students understand the full strategic situation Germany faced in 1914.
Related Articles
To learn more about the topics covered in this map, visit the following History Crunch articles:
- Schlieffen Plan
- Western Front of World War I
- Eastern Front of World War I
- Causes of World War I
- Alliance Systems Before World War I
- Central Powers of World War I
- Allied Powers of World War I
- Trench Warfare in World War I
- World War I Overview