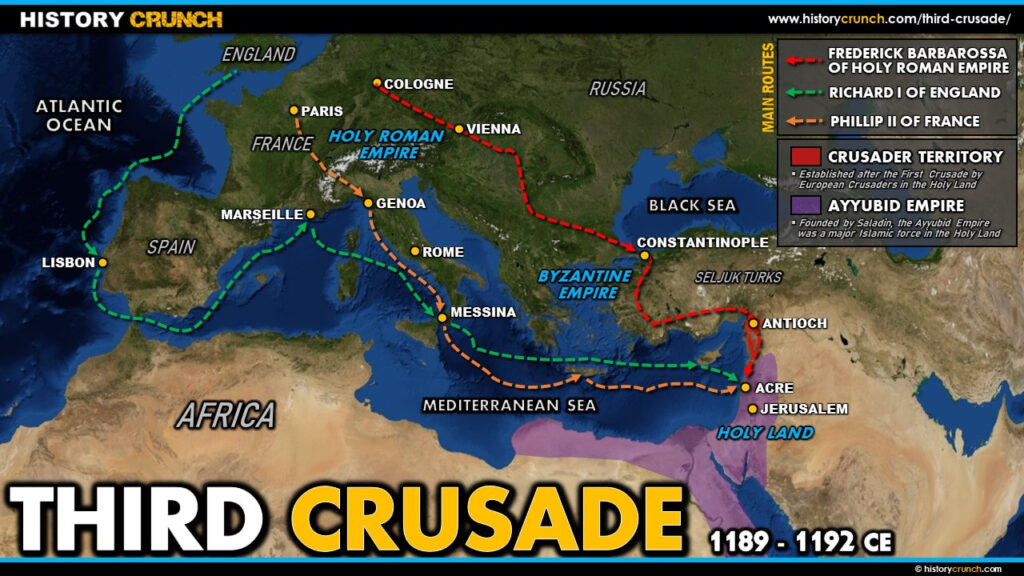
The Third Crusade took place from 1189 to 1192 CE and was launched in response to the capture of Jerusalem by the Muslim leader Saladin in 1187. Led by three of the most powerful monarchs in Europe, King Richard I of England, King Philip II of France and Holy Roman Emperor Frederick Barbarossa, the Third Crusade achieved several significant military victories but ultimately failed to recapture Jerusalem. This map was created by History Crunch to help students visualize the geographic routes of the Third Crusade and is based on the History Crunch articles on the Crusades.
Third Crusade Map
About This Map
This Third Crusade map was created by the History Crunch team to help students and teachers understand the geographic dimensions of the Third Crusade. It is designed as a visual learning tool to accompany our full articles on the Third Crusade and the broader history of the Crusades. Teachers may use it as a classroom display, a geography activity, or a discussion starter about why retaking Jerusalem proved so difficult for European crusaders even with three powerful kings leading the campaign.
What This Map Shows
The map shows the geographic context that triggered the Third Crusade. The most immediate cause was the capture of Jerusalem in 1187 by Saladin, the powerful Muslim leader who had united much of the Islamic world under his authority. Jerusalem had been controlled by the crusaders since the First Crusade in 1099 as part of the Kingdom of Jerusalem, one of the four main Crusader States. Its loss sent shockwaves through Europe and prompted Pope Gregory VIII to call for a new crusade to retake the city.
The map traces the routes taken by the three main European armies as they set out for the Holy Land. King Richard I of England and King Philip II of France, despite having been at war with one another before the crusade, ended their conflict and agreed to travel together. They met on July 4th, 1190 at Vezelay in France and set out toward the Holy Land. Philip II and the French marched to Genoa where they hired Genoese ships to transport them across the Mediterranean, arriving at the port city of Acre in May of 1191. Richard I took a different sea route and stopped at Cyprus along the way before also arriving at Acre. The German army, led by Frederick Barbarossa, took an overland route through eastern Europe and Anatolia but Barbarossa drowned while crossing a river in Anatolia before reaching the Holy Land, significantly weakening the German contribution to the crusade.
The map highlights the port city of Acre in the Holy Land as the main staging point of the Third Crusade. Acre had long been a key Christian stronghold in the eastern Mediterranean and was the site of a major siege during the crusade. The map also shows the broader campaign along the coast of the Holy Land as Richard I led his forces southward toward Jerusalem, winning several significant battles including the Battle of Arsuf. However, despite getting close to Jerusalem on two occasions, Richard I decided not to attempt a siege of the city, recognizing that even if captured it could not be held without a much larger force.
The map illustrates the geographic outcome of the Third Crusade, including the key territorial agreements made in the Treaty of Jaffa in 1192. Under this treaty, Richard I agreed to a three-year truce with Saladin. The crusaders retained control of the coastal strip of the Holy Land and Christian pilgrims were guaranteed safe passage to visit Jerusalem, but the city itself remained under Muslim control.
How to Use This Map in the Classroom
This map works well as a visual introduction to the Third Crusade before students read the full article. It can be used as a geography activity asking students to trace the routes of the English, French and German armies and identify the key locations including Vezelay, Acre and the coast of the Holy Land. Teachers may also use it as a discussion prompt asking students to consider why Richard I chose not to attempt a siege of Jerusalem even after coming close to the city, and what this tells us about the practical difficulties of the crusading campaigns. It pairs well with the First and Second Crusade maps to help students compare the different campaigns and trace how the crusading movement evolved over time.
Related Articles
To learn more about the topics covered in this map, visit the following History Crunch articles: